Hero Abilities
 Watcher – Hotkey W
Raises an invisible Watcher from a corpse. Watcher does not have truesight, has 1 HP.Not magic immune.
Level 1 – 2 maximum.
Level 2 – 4 maximum.
Level 3 – 6 maximum.
Level 4 – 8 maximum.
Mana Cost: 50
Cooldown: 20/15/10/5
Note: This skill is your free Observer Ward. Early it’ll save you from ganks. Well placed you can later observe the whole map, giving you good opportunities to kill neutral farming opponents, help you observing Roshan and also still prevent you and your team from ganks everywhere on the map.
This skill was nerfed, which removed spell immunity of the Watcher. A Hero with Radiance running into a Watcher will kill it immediately. Also this is an normal invisible unit which can be seen with truesight and can be attacked then.
 Shukuchi – Hotkey C
Nerubian Weaver becomes invisible and has 522 move speed for 4 seconds. Any units passed through will take damage.
Level 1 – 90 damage.
Level 2 – 100 damage.
Level 3 – 110 damage.
Level 4 – 120 damage.
Mana Cost: 60
Cooldown: 13/ 11/ 9/ 7
Note: This is your main harassing skill early game and your chasing and escaping ability.
 Geminate Attack – Passive
Occasioanlly the Nerubian Weaver will send out two swarms, attacking an opponent twice.
Level 1 – 7 second cooldown.
Level 2 – 6 second cooldown
Level 3 – 5 second cooldown
Level 4 – 3.5 second cooldown
Orb effect.Note: This skill will help you harassing opponents and make last hitting easier. This skill doesn’t work on your own creeps, like a few other skills.
 Time Lapse – Hotkey T
Warps the Weaver 5 Seconds back in time, reseting HP, Mana, and position. Does not effect cooldowns, gold, and XP.
Level 1 – 150 manacost.
Level 2 – 75 manacost.
Level 3 – 0 manacost.
Mana Cost: 150
Cooldown: 120/ 90/ 60
Note: This is a fantastic ultimate. It’ll place you on the area you were 5 seconds before and give you the HP you had back then. Also all negative buffs will be removed, except Witch Doctors Maledict, Dazzles Poison Touch, Warlocks Shadow Word and Bloodseekers Rupture. Later on I’ll add more about those skills, which don’t get removed by Time Lapse.
4. Skillorder
Level 1 – Geminate Attack
Level 2 – Shukuchi
Level 3 – Watcher
Level 4 – Shukuchi
Level 5 – Shukuchi
Level 6 – Time Lapse
Level 7 – Shukuchi
Level 8 – Geminate Attack/Watcher
Level 9 – Geminate Attack/Watcher
Level 10 – Watcher/Geminate Attack
Level 11 – Time Lapse
Level 12 – Geminate Attack/Watcher
Level 13 – Stats/Watcher
Level 14 – Stats/Watcher
Level 15 – Stats/Watcher
Level 16 – Time Lapse
Level 17 – Watcher/Stats
Level 18 – Watcher/Stats
Level 19 – Stats
Level 20 – Stats
Level 21 – Stats
Level 22 – Stats
Level 23 – Stats
Level 24 – Stats
Level 25 – Stats
Note: You have to get one level Geminate Attack first for easier last hit creeping. The Watchers on level 3 are necessary, to prevent you from ganks. How to place them you find in Section 6 – “How to use your Abilities?”.
In midgame you have to decide what is more important for the team and for you. Some more Watchers or maxing out Geminate Attack first. I recommend another Watcher on level 10 or 12 to watchout the second rune spot and the other one depends on the line you are and on the progress of the game.
While Stats could be very helpfully for Weaver you have to max out Shukuchi and Geminate Attack and getting ultimate and some Watchers before getting Stats.
5. Itembuild
Here’s Nerubian Weaver Itemlist:
Total Cost: 20895
Normally you’ll only get Butterfly or Heart of Tarrasque, which will only be a total cost of around 15000 gold then.
Startitems:
Do as you wish. Some guys prefer RoR, some prefer Tangos, some prefer Flask, and some guys prefer other things. It’s your decision which you prefer.
Early Game:
There are three possibilities for you to buy in early game.
OR
OR
Vanguard vs 2 Bracer
250 HP
4 HP/Sec Regeneration
65% to block 35 damage
Most expensive part: 1100 Gold
Cost: 2275
228 HP
0,86 Armor
78 Mana
6 Damage
Most Expensive Part: 185 Gold
Cost: 1020
The 4 HP/Sec Regeneration is nice and the 65 % Chance to block 35 damage increase your effective HP, but the cost of Vanguard is more than the double of 2 Bracer and doesn’t give you Mana. That’s why I prefer 2 Bracer’s, but if you prefer Vanguard, buy it.
Empty Bottle vs Tango/Flask & Clarity Potion
This just depends on how much Tangos/Flasks and Clarity Potions you need. If you need more than 700 gold for them, it’s worthless to get them, because of the cost of Empty Bottle.
Do I really need Boots of Speed?
No, you don’t need, if you feel comfortable with it, you can skip them until you finished your Core Item, but remember, if your manapool is going to be empty and somone is chasing you, you’ll be beated, because of your extremely slow natural movespeed.
Core Item:
Shop Level: 4
Description:
+8% Chance to Evade
+60 Damage
Passive: Immolation
550 Radius
35 Damage/sec Immolation
Cost: 5325
Why I should buy Radiance? It’ll just show the opponents where I am.
Thats right, but Weaver isn’t a typical invisible Hero. Your invisible time is just 4 seconds.
Lets see which make Radiance that good for Weaver:
- Helps Weaver farming, especially with Shukuchi.
- Helps you chasing an opponent. When you use Shukuchi to catch up an escaping Hero, you not only do the damage of Shukuchi, you also do the Radiance damage.
- + 60 damage
Which kind of damage is Immolation?
It’s magic damage. It can be blocked by Black King Bar and reduced by items and spells which reduce magic damage. The normal Hero magic reduction is 25 %, which means you do 26,25 damage per second to every Hero in your radius. If you use Shukuchi this means you do the following damage in the 4 seconds of Shukuchi: (120 + 35 * 4) * 0,75 =195 damage
You do nearly 200 damage just for chasing the Hero for 4 seconds. Isn’t it great?
Why shouldn’t I get Monkey King Bar or Buriza?
It’s simple. When you use Shukuchi to chase an opponent, you can’t attack. Radiance fix this problem with the damage-aura.
Optional Items:
Shop Level: New Recipes
Description:
Creates a small very fast flying unit that can carry items to and from your base. If it dies the items will fall to the ground. Has magic immunity, high mana, hitpoints and armor. Cannot carry Gem. Can cast Burst and courier shield.
Especially, when you play with Tangos and Clarity Potions the Crow will very helpfully for you, because if you run out of HP and/or Mana and need an Tango and/or Clarity Potion fast, the Crow will help you in no time.
You’ve finished your Core Itembuild and want to know, what do buy next. The possibilities are following items. The order you have to choose yourself.

OR

When you have problems against heavy nukers, you should get one of those both items.
Shop Level: 1
Description:
+90 Run Speed
Active: Teleport
60 Second Cooldown 4 Second Cast Time
Cost: 2700
Note: Because you already own Boots of Speed, it just should be 2200 gold.
Boots of Travel vs Power Treads
Some guys might say, you don’t have the highest Attackspeed and you should buy Power Treads. Surely Power Treads gives a nice attackspeedbonus, but don’t you think teleport is much better than running over the half map or buying a Scroll for 135 gold, which just teleport you to buildings?
Boots of Travel cost 2700 gold, Power Treads cost 1530. This is a different of 1170 gold. If you buy 9 Scrolls, you have the same prize like for buying Boots of Travel and if you don’t buy scrolls, you’ll lose gold and experience, because you can’t farm.
For me Boots of Travel is nearly always the better choice, but thats a matter of taste. If you really decide to buy Power Treads, you should get them directly after Radiance or maybe before and always have a Scroll with you.
Shop Level: 4
Description:
+300 Hit Points
+11 HP/Sec Regeneration
+35 Strength
Cost: 5300
Note: This is by far the most effective way to boost your HP and survivability. Something that Weaver really lacks is HP. Hence after getting a damage boost in the form of Radiance, the next logical step would be to increase your HP by buying a Heart of Tarrasque. If you farmed for Radiance very fast, you can buy Butterfly first, if you want. Butterfly increase your effective HP and your damage, but if you really are in trouble, because of your low HP, you have to get Heart of Tarrasque as fast as possible.
Shop Level: 4
Description:
Damage: 30
Attack Speed: 30%
Agility: 30
Passive: Evasion
Chance: 30%
Cost: 6350
Note: This is still the best Item you can get with an damage dealing Agility Hero. It not only boosts your attackspeed and your damage by 60 points, it also boosts your effective HP. If you have 2500 HP and someoneis doing physical damage to you, it’s like you have following HP (without the higher armor reduction): 2500 * 1,30 = 2500 / 10 * 3 + 2500 = 3250 HP
The Butterfly evasion also overrides the Radiance evasion.
If the game should really go on and you already own Butterfly and Heart of Tarrasque you should think about those both items. If there are many Heros with Scrolls or Boots of Travel in your opponent team and your teammates don’t disable them or don’t have disables, you should think about getting MKB instead of Butterfly.
Items you should avoid:
All Orb Effects should be avoided, because none of them stack with Geminate Attack.
The Orb effect only works on Geminate Attacks, the cost is 2550 gold higher than the cost of HoT and the mana overkill isn’t necessary for Weaver, because her Ultimate later doesn’t require mana.
You don’t need the overkill of Mana, because after level 3 Ulti you just have Shukuchi, which requires Mana and sometimes the Watchers. On level 25 you have 1014 Mana anyway, without Bracers. This is more than enough. Heart of Tarrasque boost your Hp even more anyway.
No, don’t get this item. Even it was a option, when there was the old Aegis, but right now it’s much to risky, even for a Weaver.
6. How to use your Abilities?
Placement of Watchers
Note: Remember Watchers will be killed by Radiance aura. If one of your opponent bought a Radiance you have to place them very often new and look intensive for them. Same goes for the fact your opponents are going to buy Sentry Wards.
Early Game for preventing Ganks and runespotting:
Top Lane:
Note: It doesn’t matter you’re Sentinel or Scourge here. The first Watcher is to protect yourself from ganks. For Scourge the first one is already enough, because you’ve scouted the mainarea from where ganks are coming. For Sentinel you need the other one, because they also can come from the river. The Sideffect is, that you can spot runes. Remember, every 2 minutes a run is spawning. If it isn’t on your scouted runspot, it’s on the other. Tell it to your team.
Bottom Lane:
Note: The upper on is obviously mostly for rune spotting but for Scourge also preventing from ganks. The lower one is only for gank preventing.
Mid Lane:
Note: You better go not mid lane, but if you really have no coice you should place 1 Watcher like this and the other Watcher on one of them rune spots. More about not going mid comes in Section 7 – “Strategy”.
All Watcher’s used:
Note: The Watcher on Roshan isn’t necessary but I think it’s a good choice, even if you have to stop spotting on the bottom right corner. If you look closely and often enough on the minimap also this shouldn’t be a problem.
Shukuchi
Harassing:
 | This image has been resized. Click this bar to view the full image. The original image is sized 728×594. |
Note: Go to the upper mark and if you reach the first mark use Hotkey for Shukuchi and when you damaged your opponent, go back, except the fact you can kill him. Then you should go a bit towards so you can hit him a few more times. If you are going to harass your opponent like that, you should wait for a creep getting low HP, which will get killed then, too.
Escaping:
If you want to escape someone you should run and don’t hit him, because he’ll know then where you’re and where you’re running.
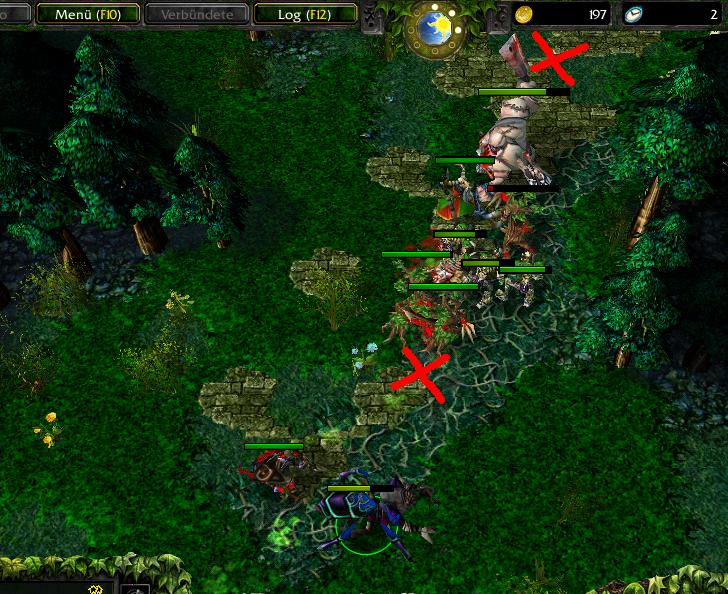
Chasing:
| This image has been resized. Click this bar to view the full image. The original image is sized 715×464. |
Note: In this Situation I was just using Shukuchi and run to the red mark, pick up the rune before the opponent can take and start attacking Axe. I’m a little bit in front of him, so I can attack him more often.
Fighting Early Game:
When you want to fight an opponent early, because you think you can kill him, Shukuchi can be an very useful tool, if you use it right. To get the timing when you can start a fight early game, you should read Section 7 – “Strategy”. When you start to engage an fight, your opponent won’t most likely not fight back directly, because he have to recognize it and then click on you. This takes a short amount of time. Just attack him a bit, use Shukuchi behind him and start attacking him again. You have the advantage of the surprise again. Remember, you’re very weak early game. That’s why you have to be a bit tricky. With this you not only nuke him with your Shukuchi, you also can hit him more, than he can hit you. This only works, when you’re facing an solo Hero and when there isn’t coming a new creepwave. It would be very painful, if you attack your opponent from behind and the coming creepwave would start attacking you, too, when your Shukuchi is cooling down.
Geminate Attack
Activating Geminate Attack:
Geminate Attack will only be activated, if you rightclick or A and leftclick on an opponent or make attackwalk by pressing A and leftclick on the ground.
Last Hit Creeping:
Note: As you can see, the creep right in front of me is on low HP. Right click on it to activate Geminate Attack directly and the creepgold will be yours, even if the first attack won’t kill the creep directly, the second will.
Harassing:
When you want to harass your opponent with Geminate Attack you have to wait until Geminate Attack is cooled down. Rightclick on the opponent then, wait for the first attack which is out and click back. The second attack will get out immediately, if you timed right.
Time Lapse
You have to use Time Lapse, when you lost very much HP in a short time, like in this screen, where Pudge used Dismember & Rot on me. I used Time Lapse directly after his ultimate and had half of my HP back.:
7. Strategy
Lane Choosing:
You should absolutely avoid Mid Lane, because you’re very fragile and your range is to low, to stay back. Normally on the Mid Lane there is atleast 1 ranged Hero who can harass you, whenever you want to do a last hit.
Top or Bottom Lane don’t really care, except you want to go for Vanguard, then you may should choose Top Lane for Sentinel and Bottom Lane for Scourge. Its also better, if you choose not to Solo.
Early Game:
Most important early game is to stay alive and farm. Harassing comes next. If you face some Nukers you should better change lane with someone or ask for help. Otherwise you won’t stand a chance.
If you’re facing melee Heros or just 1 melee Hero on your lane, you’ve to harass them constantly with Geminate Attack and Shukuchi. If the opportunity comes, you may can kill someone, but don’t try to kill someone with a stun (like Sven) or with Blink (like Magina), because this is most likely worthless. Those guys you just have to send back because of your harassing. A Sven could you beat easily, even if you have full HP and he have half HP. Just the Nuke will lower your HP like hell and then the few attacks he give you. A Hero with Blink like Magina can easily escape and you can’t catch him up, because his Blink Cooldown is lower than your Shukuchi Cooldown. You should also always try to kill atleast 1 creep, better 2, if you use Shukuchi, to harass an opponent. That’s all you can do early game. Don’t rush anything, because Weaver is fragile and item dependent.
Mid Game:
You go on like in Early Game until you’ve finished Radiance. With Sacred Relic you may can look for some kills, but you still should focus on farming.
After you’ve finished Radiance, you should farm even more and look for Heros without disable and escape mechanism. When you engage a Hero like that, you backstab him or Shukuchi behind him. If he’s going to beat you with nukes or physical attacks, just use Time lapse and finish him off. You also should help your teammates with ganking opponents. You deal now high amounts of damage with the Immolation Aura, Shukuchi & your physical attacks, but mainly you should still focusing on farming, if your team isn’t going or isn’t able to finish it off right now or atleast finish 1 last tower off. Also now it’s the time to place more Watcher’s around, making life for you and your team much easier.
Late Game:
This is your time. You now have an even bigger damage output or higher HP to stay longer while dealing damage. In the best case you have both.
Late Game is all about pushing and this is excactly what you do. You go with your team and push. They support you and disable the enemies, when you deal damage, but you have to be always careful, because of your low range you run far into the enemies to do this.
If opponents are pushing, you should try to damage the opponents creeps with Shukuchi and Immolation Aura without beeing attacked. Your opponents may have Wards or a Gem, which makes this a bit risky, but you can deal very much damage to the creeps with that. Let’s think about 12 Treants/Ghouls are coming.
120 + 35 * 4 = 260 damage per Creep 260 * 12 = 3120 (!) damage if it comes good.
Make this two times and the big wave is already gone.
8. Good Allies, Bad Enemys & Countertactics
Good Alies
Very nice ally for almost every Hero. He can heal you and he can help you getting early kills with Repel and/or Slow.
Fantastic ally. He use Aphotic Shield on you, you use Shukuchi, go behind the opponent(s) and start attacking. The opponent(s) have 2 possibilities right now. Attack and Running. If he/they run away, you land very much hits. If he/they start attacking you, you don’t only deal your physical damage, also Aphotic Shield does damage and right now after Aphotic Shield ends, Shukuchi should be cooled down.
He give you mana, so you can spam Shukuchi and you can clear with his Illuminate and you Shukuchi the whole rest of the remaining creepwave. Also he helps you with his lane dominance, because you most likely don’t have any.
Bad Enemys
Every heavy nuker will make your life from early to midgame to hell. Most of them have powerful nukes. The listed are the most annoying nuker because they have spamable nukes and/or 2 powerful nukes, which make them even more fearsome.
Those both massdisablers are even more fearsome than the nuker. They not even can disable you for more than 6 seconds, they also have 1 spamable nuke and fantastic ultimates.
Every Hero with Silence can beat you, because you can’t use your escape mechanism. The listed ones also are often better from early to late game, if they were played well.
This Hero is both, a heavy nuker and a silencer. He has an 300 damage AoE nuke which only have 8 seconds cooldown and with Witchcraft level 4 only 4 seconds cooldown. His silence also last 6 seconds and her ultimate don’t make it possible for you to chase him, because you most likely would die, before you could kill him.
He’s really a pain in the ass. He has an ultimate, which not only disable you for 5 seconds, it also does 500/775/1075 damage to you. He has an 7 second disable also, which let him wait for allies, a 300 damage nuke and 80 % base damage reduction. How painful.
I don’t know this is your worst enemy or bane. Anyway, both are from early to lategame really annoying for you, even if you’re a well playing Weaver user. He not only has a silence ultimate, which last 16 seconds. His ultimate do 80 damage per second (80 * 16 * 0,75 = 960). Last, but not least, he has an 250 damage nuke and a movespeed increase by 30 %.
This Hero has a 275 nuke, with 5 seconds cooldown, a damage reduction aura and an ultimate which can make your ultimate useless, because it kill you instantly, when your’ve lost more than 60 % of your HP.
He not only has powerful nukes, he also has high HP and spellreduction. His Hook can hit you, even if you’re invisible and his combo can kill you early easily and with Necronomicon he can kill you until early part of lategame very easy. His combo do (400 + 175 * 3 + 100 * 3) * 0,75 =918,75 damage, if you won’t get attacked, when he dismember you.
He’ll be painful for you from early to late game. There is no chance, you can do something against a good Magina. He can easily chase you with blink, he suck out your mana and he have an powerful ultimate. If he really is on low HP you stand no chance, to kill him, because of blink. And he also can permabash you.
Countertactics
There are many possibilities to counter a Weaver. Hero’s who can counter Weaver you’ve already seen under the section “Bad Enemies”.
Guinsoo and other disables
Disables will help you against Weaver in a teambattle, because he’s faster dead than he can escape or cast Time Lapse.
Feedback and Manaburn
No mana means no Shukuchi and without Shukuchi Weaver is even with Time Lapse a free kill for an average team.
Permabash
Permabashing Heros will make your life to hell, because Shukuchi and Time Lapse have a long casting time. In 1on1 situations every good permabashing Hero will kill you easily. For example a Troll with 2 Basher.
Dagon and every kind of Nukes
Because you’re very fragile this will beat the hell out of you from early to mid game.
Every kind of Silence
A silenced Weaver can’t use Shukuchi and Time Lapse, means he’s an easy kill, until he get Heart of Tarrasque
At last the best way, to counter a Weaver. Harassing. If you harass a Weaver from early to midgame and he can’t farm his core items, he don’t stand a chance. Even if he don’t do.


 Filed Under : by pej4444
 Saturday, May 29, 2010
0 comments:
Post a Comment